
...

larbel

1,248 posts
·
Joined 2021
You have the night gold 868 wheels with 255mm width instead of 285mm rear tyre width (factory fitted 868).
Since you add fenders, i guess you also will use spacers?
Since you add fenders, i guess you also will use spacers?
1,096 posts
·
Joined 2022
Was it easy to remove shifter? I hate the damn seam on the back I’d like to replace it with carbon. Is this what you bought?

 paddleshifterz.com
OEM BMW M Performance Gear shifter, carbon - alcantara
The ergonomic shape of the back grip shells and their special materiality ensure a dynamic, sporty driving experience. The M Performance selector lever is available in two versions: with backrest shells made of open-pored 1K carbon fabric or made of Alcantara. As a special highlight, the...
349 posts
·
Joined 2022
I dig that shifter. though i kinda like the blue accent of the stock one. seems like that could be left in place?
209 posts
·
Joined 2022
Any more detailed walk through of the M1 M2 install process that you referenced or on the piggyback unit needed? I'm really interested in retrofitting these.
1,492 posts
·
Joined 2022
Looks great! Could you please post a photo of the dashcams? I'm booked for the same for next week.
1,096 posts
·
Joined 2022
I wonder if it’s possible to remove just the back side of shifter with the seam without taking off whole shifter?
262 posts
·
Joined 2022
Yes, you just pry it off at the top with some plastic prying tool and snap on a new one.
1,332 posts
·
Joined 2021
How was the steering wheel trim install on its own? I was thinking about getting a new trim and installing it myself if it's not too hard.
2,187 posts
·
Joined 2021
Questions, please.
1) Are these the modules of your Aliexpress kit?
![Image]()
2) Which module install in the steering wheel, and in the shifter assembly - #1 or #2 above?
3) These modules look like pnp, what OEM PCB is replaced?
1) Are these the modules of your Aliexpress kit?
2) Which module install in the steering wheel, and in the shifter assembly - #1 or #2 above?
3) These modules look like pnp, what OEM PCB is replaced?
larbel
Discussion starter
332 posts
·
Joined 2021
That is the receiver module and harness that goes into the shifter console, the transmitter with the PCBs aren’t shown in your picture.Questions, please.
1) Are these the modules of your Aliexpress kit?
View attachment 19742
2) Which module install in the steering wheel, and in the shifter assembly - #1 or #2 above?
3) These modules look like pnp, what OEM PCB is replaced?
2,187 posts
·
Joined 2021
Paddles PCB swap - not shown in thread:
OEM PCB (bottom), aftermarket paddles PCB (top):
![Image]()
Swap (two screws on each paddle PCB, white wires OEM PCB):
![Image]()
Reassembly:
![Image]()
Steering wheel trim (OEM bottom, aftermarket top):
![Image]()
Assembly notes:
OEM PCB (bottom), aftermarket paddles PCB (top):
Swap (two screws on each paddle PCB, white wires OEM PCB):
Reassembly:
Steering wheel trim (OEM bottom, aftermarket top):
Assembly notes:
- swap is no complication, unscrew and swap. PCB button contacts are rubberized, use the aftermarket contacts and not the OEM as the OEM contacts are inserted with pins into PCB and there are no holes for the pins in the aftermarket PCB. Rubber contacts make the paddles "click" solidly, if the contacts are not installed correctly then paddles will not "click" at all when pressed.
- aftermarket trim and paddles are not OEM quality, OP was right. OEM parts are a must if you want this mod to look and feel OEM.
- I just need the car now.
209 posts
·
Joined 2022
Nice! Did you end up ordering the Ali kit linked earlier in the thread or a different kit?Paddles PCB swap - not shown in thread:
OEM PCB (bottom), aftermarket paddles PCB (top):
Assembly notes:
- swap is no complication, unscrew and swap. PCB button contacts are rubberized, use the aftermarket contacts and not the OEM as the OEM contacts are inserted with pins into PCB and there are no holes for the pins in the aftermarket PCB. Rubber contacts make the paddles "click" solidly, if the contacts are not installed correctly then paddles will not "click" at all when pressed.
- aftermarket trim and paddles are not OEM quality, OP was right. OEM parts are a must if you want this mod to look and feel OEM.
- I just need the car now.
1,368 posts
·
Joined 2021
I wish there was a video cause even reading i'm finding it confusing how to start haha, I will wait in due time until it's all documented on youtube perfectly
larbel
Discussion starter
332 posts
·
Joined 2021
I really should have taken more pictures, but it’s really not that complicated at all, you can see from the 3rd picture on @Technic last post the complete buttons and the transmitter, those all go inside the steering wheel with the split connectors for power and the wrapped transmitter.
And on his previous post, you can see the receiver module and the harness (#1, 2). Those go inside the shifter console and the splitter cable connectors to the shifter module. The hardest part is really removing the airbag, if you can do that you’ll have no problem installing the buttons.
And on his previous post, you can see the receiver module and the harness (#1, 2). Those go inside the shifter console and the splitter cable connectors to the shifter module. The hardest part is really removing the airbag, if you can do that you’ll have no problem installing the buttons.
688 posts
·
Joined 2022
I'm just confused as to what parts to order, but I haven't really taken notes as I've gone through the thread. My impression is you need to order the paddles separate from the module? I'm fine with doing everything other than the high voltage system (only because I've never done it), but if I have a tutorial I would be fine.
1,368 posts
·
Joined 2021
Some of us, at least me, am not good with hardware messing around with stuff. But I can usually stomach it if there's a video I'm watching and pausing in front of me
larbel
Discussion starter
332 posts
·
Joined 2021
If that's the case, you'd definitely be better off with a professional installer. Removing airbag should be done with experienced hands, especially on our EV where you'd need to disengage the high voltage batt, can be scary with the drivetrain malfunction warnings...
209 posts
·
Joined 2022
lol, I was doing the same thing. I'm trying to consolidate down a parts list, install steps, and associated tutorials where I can find them. I think this is the parts list, but would love if any other folks have validated. I'll update as any new info comes in
- oem paddles - 61318090047
- oem shroud - 32-30-9-503-189
- ali kit - https://www.aliexpress.com/i/3256802788014853.html?gatewayAdapt=4itemAdapt
- CF steering wheel trim, if replacing (2 piece, varies based on heater/drivers assist) - believe these are the P/Ns for w/ heated wheel and driver's assist - 32-30-9-882-893, 32-30-9-882-894
2,187 posts
·
Joined 2021
Disconnecting the battery on the i4 has a very specific procedure:
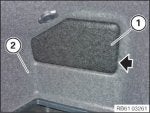
- Find flap on right-side of trunk, remove
![Image]()
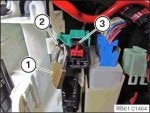
- Look for red tab (3) on fusebox:
![Image]()
- Pull red tab out - disconnect 12V battery from HV - and lock:
- Check message on display - confirm 12V battery disconnection:
![Image]()
- Disconnect negative post from 12V battery under hood:
![Image]()
To reconnect 12V to HV battery, follow steps in reverse.
-
If you are unsure that you can follow these instructions then it means that you need a professional installer to install your parts.
- Find flap on right-side of trunk, remove
- Look for red tab (3) on fusebox:
- Pull red tab out - disconnect 12V battery from HV - and lock:
- Check message on display - confirm 12V battery disconnection:
- Disconnect negative post from 12V battery under hood:
To reconnect 12V to HV battery, follow steps in reverse.
-
If you are unsure that you can follow these instructions then it means that you need a professional installer to install your parts.
Attachments
-
 21.3 KB Views: 114
 -
 21.6 KB Views: 76
58 posts
·
Joined 2022
This looks like an expensive tweak to avoid reaching down with your Left hand to change the mode.. How often do you folks flip between different modes ")
180 posts
·
Joined 2022
I switch every time I see a fast car! 😁 And given I'm usually trying to hit the button in a hurry (while driving), I view this mod as a money saver since it's gonna help me not crash! 😅
2,187 posts
·
Joined 2021
I need to make them "for kids"... they are visible now, let me know.
262 posts
·
Joined 2022
The HV disconnect on mine is actually not on the fuse box. It's located above it on it's own compartment.
![Image]()
![Image]()
larbel
Discussion starter
332 posts
·
Joined 2021
It cycles through all modes. Like when you're at Sport, and press M1 again, it goes to Sport Boost, and then again for Sport Individual. But if you press M2 when you're at Sport Individual, it goes straight to Comfort instead of Sport Boost then Sport.
180 posts
·
Joined 2022
I'm dragging my feet on this cuz I'd like to also add carbon fiber trim at the same time, but that costs more than the button upgrade. I'm wondering if a stock G80 or G82 wheel (with DAPP) will work the same? That way I could hold on to my stock wheel and switch them back when I sell the car.
-
?
-
?
-
?
-
?
-
?
-
?
-
?
-
?
-
?
-
?
-
?
-
?
-
?
-
?
-
?
-
?
-
?
-
?
-
?
-
?
- posts
- 303K
- members
- 16K
- Since
- 2020
BMW i4 Community and Owner's Club - Join the conversation about the all-new BMW electric sedan
Top Contributors this Month
View All
rollermonkey
166 Replies
Phillies8008
136 Replies
i4m50Norway
105 Replies


